Nail art tricks at home :
Obviously, we’re not all nail art professionals here, but learning some of the right nail art tips can make you pretty darn close to being one! For most of us, our nails are an extension of our fashion sense and should be treated the same as we do our hair or our outfits. Even if it’s just applying a nude colour to your nails, keeping them nice shows that you take care of yourself. Sometimes though, we like to spice up our plain old nails and that’s when these nail art tricks at home will come in handy!
5. PLASTIC WRAP
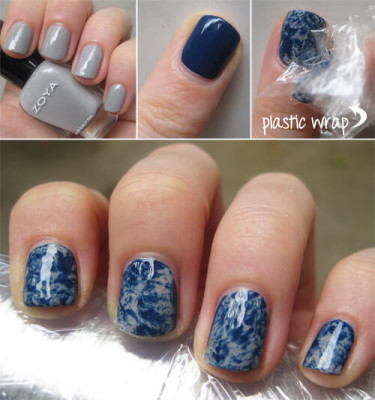
Do you want fool-proof marble nails in just a few minutes? Just use some plastic wrap! First, paint your nails with a base colour and make sure to let the polish dry completely before moving on. Then, working with one nail at a tme, apply a coat of the second polish over one nail. Quickly grab a crumpled piece of plastic wrap and blot the top of your nail once or twice. When the sticky wrap touches the wet polish, it will pull up a bit of the colour, creating a marbled effect with the base colour underneath. If you pull up too much of the wet polish, just add a little more colour and dab it with plastic wrap again. Continue until you’ve completed each nail. Is not it an interesting trick for nail art at home?
4. PERFECT FRENCH MANICURE
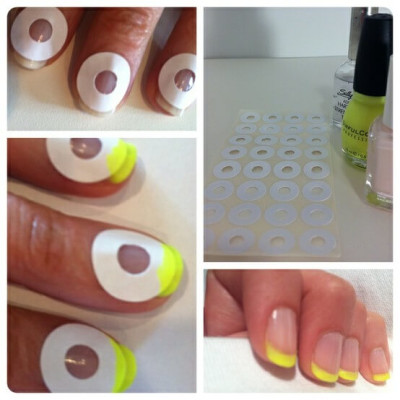
Giving yourself a French manicure seems simple enough, but most of us know that it’s a lot harder than it looks. However, with this tip, you will be able to give yourself the perfect French manicure every time from now on. After painting your nail with a base coat, simply stick binder hole reinforcement stickers or any other circular sticker you have on your nails where you’d like your French manicure line to start. Then paint the tips of your nails as you normally would. Once you peel off the stickers, you will have the perfect French manicure tips!
3. HOMEMADE DOTTING TOOL
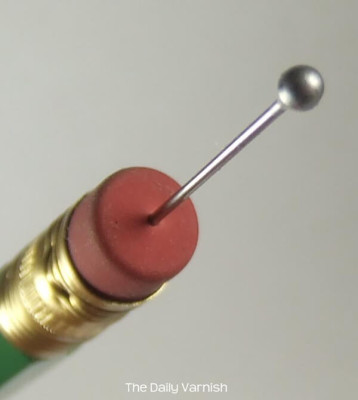
Many nail art designs incorporate polka dots. So save yourself the hassle and stress of making perfect polka dots with your nail polish brush by creating tools to make them instead. The tips of a bent bobby pin make the perfect polka dots. You can also create a dotting tool by pushing a straight pin into the eraser of a pencil. Then of course you can use the tip of a toothpick to make even smaller polka dots. So there you have it, three dotting tools for any size polka dots you may need!
2. SPONGED OMBRE NAILS
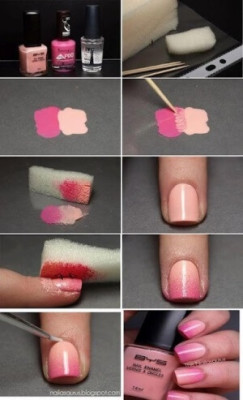
Ombre has been a huge trend this past year for hair but it has recently been adapted to nails too. The simplest way at home to achieve this nail art tricks at home is to first paint your two ombre colours on a surface that can be easily cleaned after. Mesh the two colors together in the center using a toothpick, then dip a makeup sponge into the two colours. Simply apply the polish that was picked up by the sponge onto your nail and wow! Beautiful and easy ombre nails!
1. SCOTCH TAPE
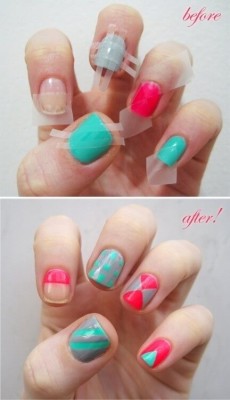
Scotch tape is great to use for nail art because it allows you to set parameters on each nail. You can create easy stripes, checkerboard designs, and diamond or triangle shapes. If you are going to use scotch tape, though, make sure your nails are completely dry with their first coat before proceeding to put the scotch tape on. Otherwise you run the risk of the tape ruining your base colour once you peel it off. Try experimenting with scotch tape to figure out what kinds of designs you can create.
Hope you have liked these tricks. Try them at home. You may also check some cool eyeliner tricks.

